Features
Balance sheet and
cash flow modelling

The benefit of getting the x3 financial statements working together
Integration between the x3 financial statements, and getting the linkages between the statements working ‘properly’ is the necessary precursor to running a stress test through your model. Without it you won’t be confident that e.g. a change in revenue or costs is fully reflected in cash flow.
For example, a change in revenue will have a knock-on impact to balance sheet receivables. As the business grows and revenue increases, receivables will also increase, reducing cash flow.
Other balance sheet movements will also be triggered by the change. As a business grows we could for example expect tax and VAT cash outflows to increase and (depending on the exact relationship with working capital) cash flows associated with short-term financing to change.
Getting your model stress test ready
Just one change on the profit and loss (revenue) could have multiple down-stream balance sheet and cash flow impacts. Those balance sheet line items need to be modelled sensibly, and the financial statements set up so that they ‘talk’ to each other: so that the balance sheet responds to changes on the profit and loss, the cash flow impacts of the changes are felt within the statements, and the balance sheet check stays true.
Without the above, you won’t be able to gain confidence that the stress test you are running (even if it’s something as simple as a straight-forward revenue flex) is being reflected in cash.
6 steps we use to get a balance sheet balancing from the start of an Excel model build
Here are six steps we take to get the key financial statement linkages in place. The idea is to get a mini-version of the financial statements together, with a first balance sheet line item in place and the balance sheet check true.
With micro financial statements in place, it’s easier to slot in further balance sheet line items (e.g. the tax and VAT liabilities).
The build process sees new balance sheet figures getting slotted into the statements, and the check temporarily firing an error. At the next step, as the associated (e.g. tax or VAT cash flow) makes its way into the cash flow statement, you can quickly watch the balance sheet check register “true” again.
Building this way makes sure the balance sheet check always stays true. The alternative (of getting your balance sheet balancing right at the end) could be problematic. Simply because, late in the build of a model that’s getting detailed and somewhat complex, you could have multiple errors compounding together, making it more difficult to find the source of the problem.
Step 1: the profit and loss
Here’s the six step process we use to get the balance sheet balancing early on in a build. Building using this method gets an early balance sheet check into the model and the financial statements ‘talking’ to each other properly before the complexity expands.
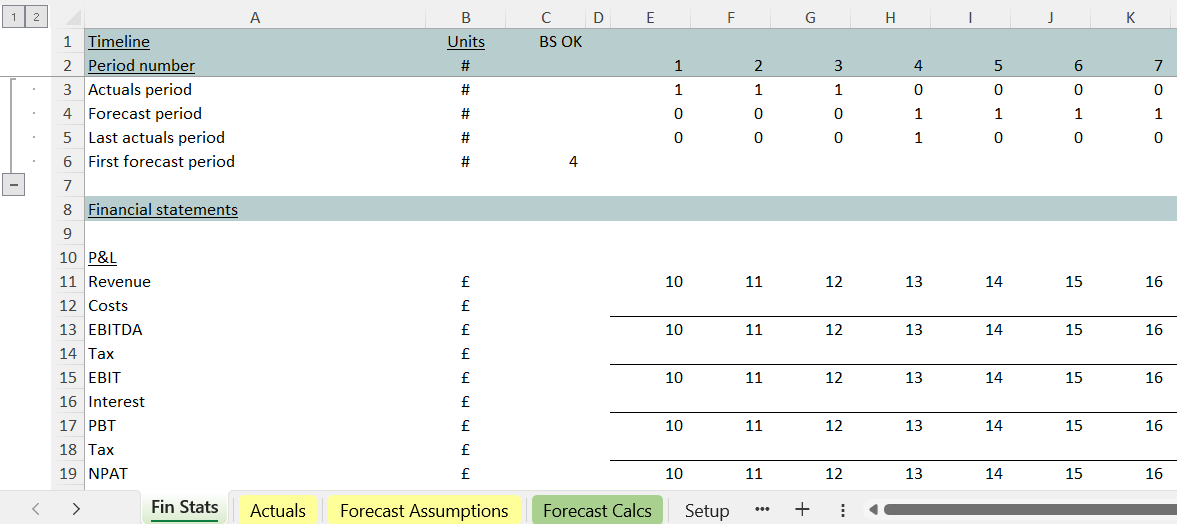
Step 1 establishes a profit and loss statement using the structure shown in the screen shot below. In this version you can see some dummy numbers appearing at line 11. For now they could just be hard-codes (perhaps highlighted a bright neon colour acting as a reminder that there’s further work to do on that section yet), anticipating an assumptions-driven revenue forecast.
Step 2: create the balance sheet framework, slot the first line item in
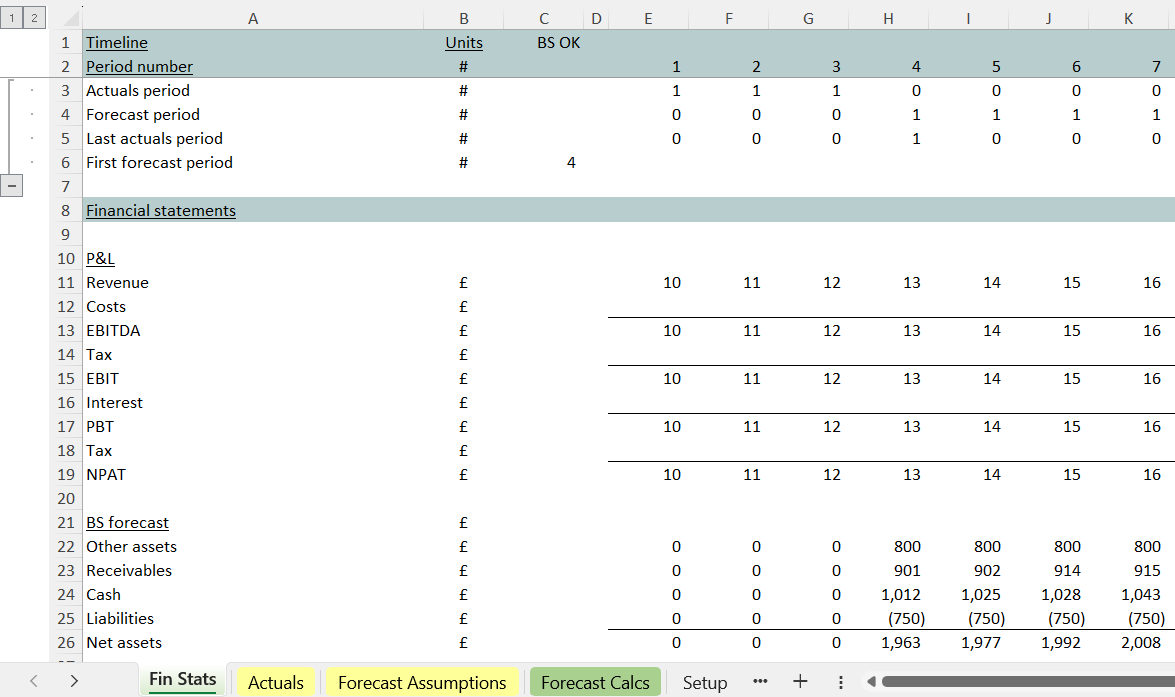
At the start of this step we lay out just a few balance sheet line items as shown below. The ones that are not being modelled yet stay flat for now. For this model that’s line 22 “other assets” and line 25 ”liabilities”.
As part of getting a forecast up and running and modelling our first balance sheet line item ‘properly’, in this example we imagine we are going to forecast receivables first at line 23.
The benefit of control accounts
Here’s where receivables are being forecast, in the ‘Forecast Calcs’ tab.
Notice the layout in a ‘control account’ or ‘corkscrew’ at lines 34 to 39. The top of the control account shows the opening receivables position. The subsequent lines show, step by step, what’s acting to change that opening position. At the bottom we can see the forecast for the balance sheet line item.
The layout is designed to separate and clearly show what’s acting to change the receivables position, in as much detail and as transparently as possible.
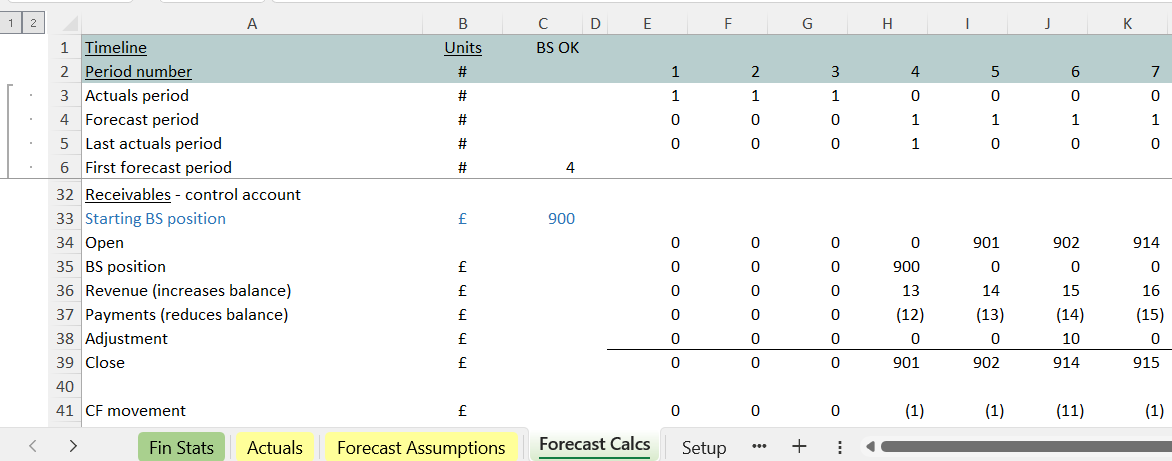
Line 39 (the receivables position) is fed into our model’s balance sheet at line 23 on the ‘Fin Stats’ tab.
Notice the cash flow impact of the change in receivables slotted in under the control account at line 41. At the next step we’re going to imagine feeding the associated cash flow impact (line 41) into the cash flow statement of our mini-model.
We always set out balance sheet line items like this – using control accounts to spell out the position changes, and slotting the cash flow in underneath. That allows someone to keep track of both the balance sheet position, and its related cash flow impact. As the build proceeds new balance sheet items are slotted into the financial statements from the bottom of each control account (the balance sheet check temporarily registers an error). Next, after slotting in the related cash flow impact, the balance sheet check starts registering “true” again.
It’s a build methodology that means, as the model grows, it stays balancing at all times. As the work expands and becomes more complex, the balance sheet check never strays out for any significant length of time.
What helps here is laying out the balance sheet line items out in corkscrews/ control accounts, with the cash flow impact underneath, feeding them into the financial statements one by one watching that the balance sheet stays balancing.
Step 3: lay out the cash flow statement
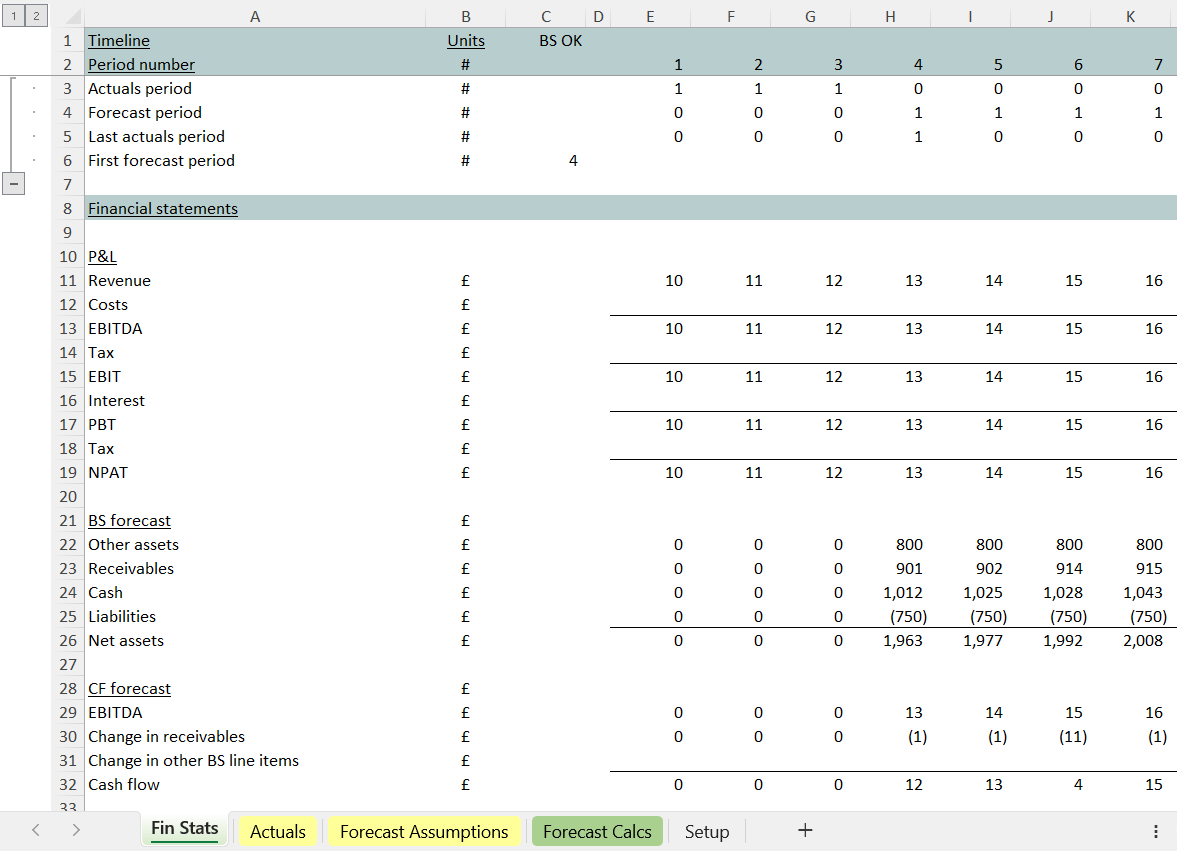
Now that the first balance sheet line item (receivables) is modelled – with both the amount and the cash flow impact calculated, we’re ready to lay out the cash flow statement. You can see that at lines 29 through 32 in the mini-model.
Notice the cash flow movement associated with the change in receivables in at line 30 of the cash flow statement.
Step 4: calculate the cumulative cash balance
Next we calculate our forecast of how the cash balance will evolve over time. See the screen shot below.
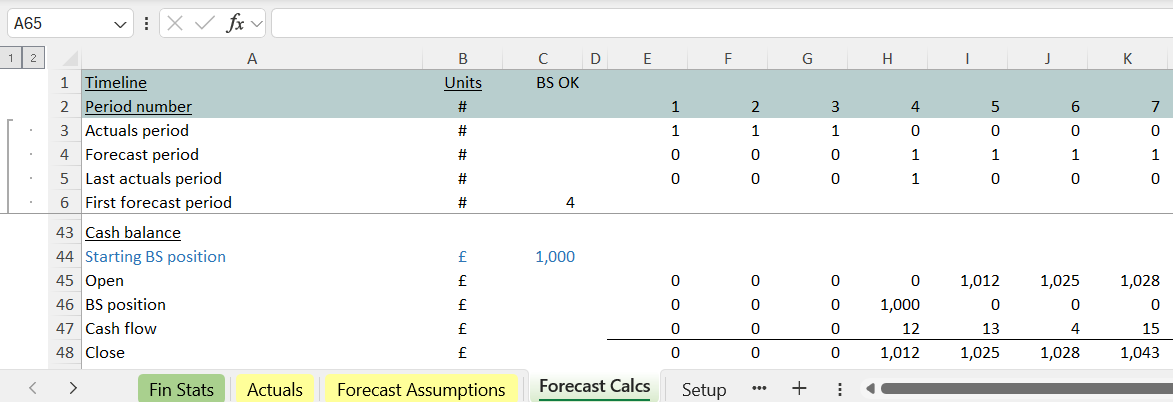
The cash balance gets slotted into line 24 of the balance sheet on the ‘Fin Stats’ tab.
Step 5: create the balance sheet check
At row 26 on the ‘Fin Stats’ tab we’re looking up the balance sheet to calculate net assets. A common mistake in financial models is to leave the model there and fail to create a second check that’s making sure your cash flow statement is working to reflect all the balance sheet changes and check that the three financial statements are linked properly and working together.
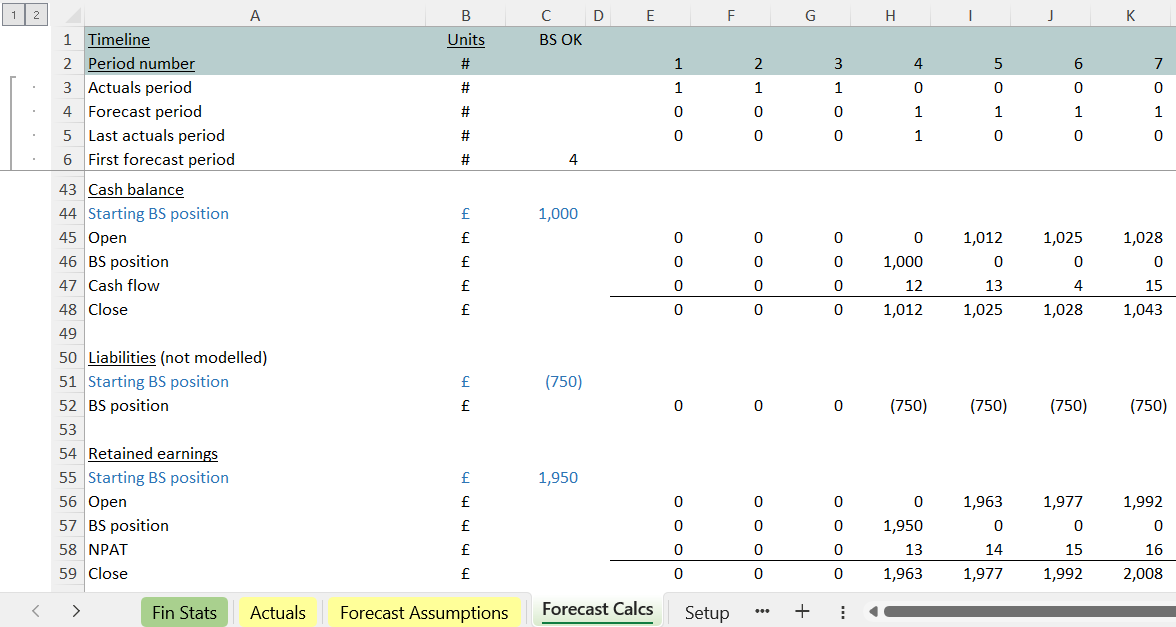
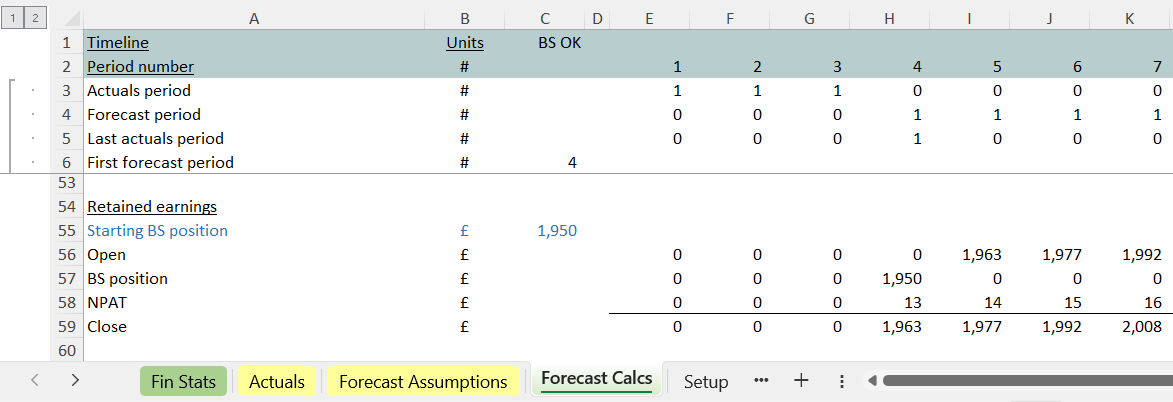
You can see here from line 55 we’re running a second check. That calculation takes last year’s retained earnings/ shareholders’ funds, adds the current year’s result from the bottom of the profit and loss statement, and forecasts the closing balance as at the end of the current period.
If the three financial statements are linked properly, the amount that’s appearing at ‘Forecast Calcs’ line 59 (last period’s retained earnings plus this period’s profits) matches the separately-calculated net assets at line 26 of the ‘Fin Stats’.
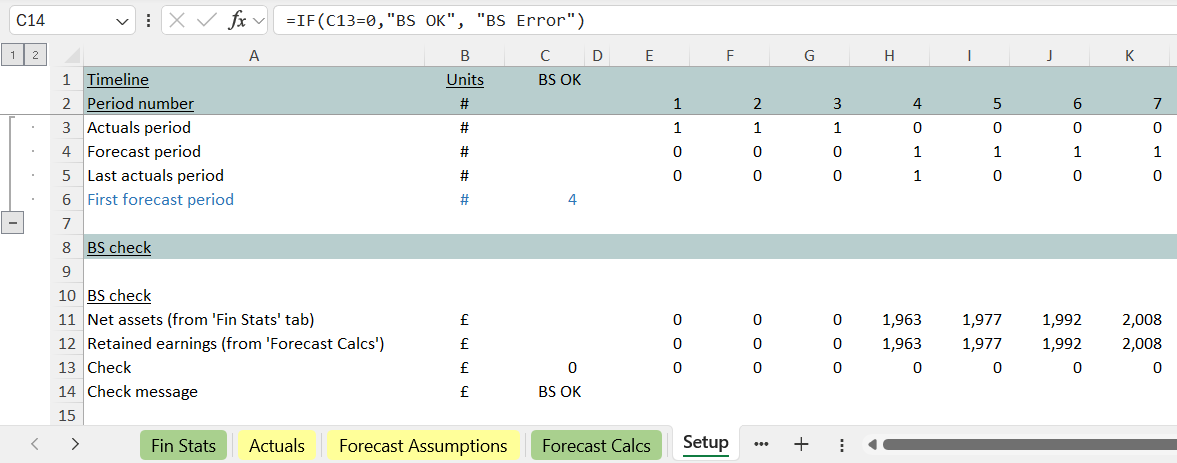
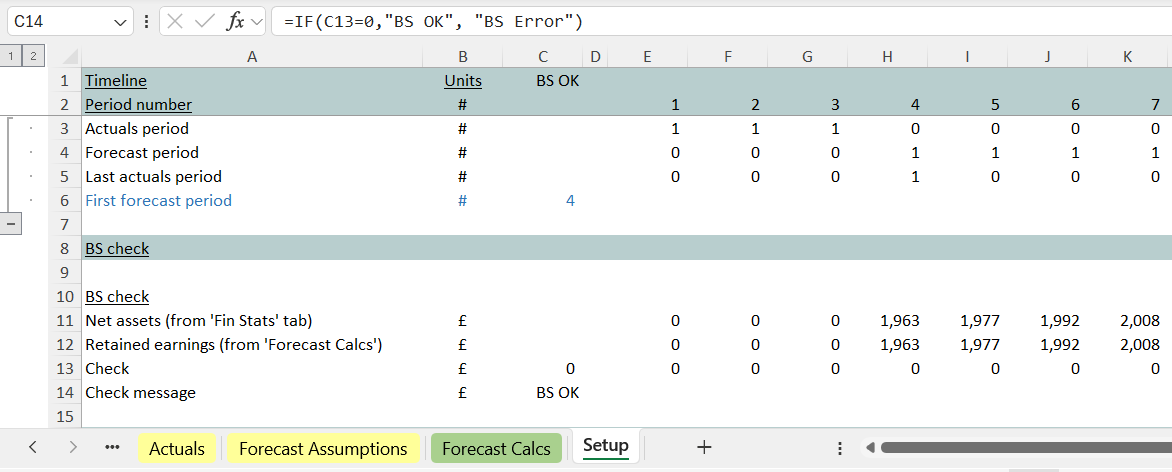
Notice in the ‘Setup’ tab below a very simple calculation that checks those figures match and generates our over-arching balance sheet check for the model.
The check message appears in a prominent position in C1 on all tabs, so it’s straight away noticeable should the balance sheet fire an error.
With:
- a profit and loss forecast
- a first balance sheet line item (receivables) modelled (line 23)
- a cash flow statement
- the evolution of the cash balance being calculated (line 24), and
- a proper balance sheet check (that looks at last period’s retained earnings plus this period’s profits)…
…we have a very tiny model that’s balancing for the first time.
Even if it’s not balancing the good news is, because there are so few numbers involved (compared to a full scale model build), it should be easier to flush out any errors.
That’s compared with the alternative of trying to get a much larger model – with lots of line items already in – balancing for the first time.
Step 6: layer in subsequent balance sheet line items, keeping an eye on the balance sheet check
Now we’re in a great place to proceed with the build. Our stripped-down micro-model is balancing. What we can do next is layer in the other balance sheet line items:
- calculating each line item in its own control account (as we did for receivables)
- slotting in the cash flow movement under each control account
- linking the balance sheet figure into the financial statements, linking the cash flow movement into the cash flow statement, watching that the balance sheet check stays true.
Building in this manner (with the check staying true after the addition of each new balance sheet line items) is a stepped methodology designed to make sure that the model doesn’t end up in a position where multiple errors are combining in the model, making it very hard to trace the problem.

We make sure your model reflects the full cash flow impact of balance sheet movements and is ready for a stress test
As described above, we use a build methodology that’s designed to make sure all balance sheet items are projected (with none missed) and that the financial statement linkages ‘talk’ to each other in the correct way.
Without that, it’s going to be very hard for someone looking at the model to become confident that the downstream balance sheet and cash flow impacts of e.g. something as ‘straight forward’ as a change in revenue are being reflected by the model.
It really is the only way to build, anticipating that someone new to the business might want to conduct a stress test on the model.